
Chapter 4: Construction Details, Section 4-20: Landscape
- 4-2001 General
- 4-2002 Irrigation
- 4-2002A Components of Irrigation Systems
- 4-2002A (1) Water Meter
- 4-2002A (2) Backflow Preventer
- 4-2002A (3) Wye Strainers
- 4-2002A (4) Main Supply Line
- 4-2002A (5) Master Remote Control Valve
- 4-2002A (6) Remote Control Valves
- 4-2002A (7) Quick Coupling Valve
- 4-2002A (8) Gate Valve
- 4-2002A (9) Lateral Supply Line
- 4-2002A (10) Emitters and Sprinklers
- 4-2002A (11) Drip Valve Assembly
- 4-2002A (12) Irrigation Conduit
- 4-2002A (13) Irrigation Controllers
- 4-2002A (14) Electrical Pull Boxes and Conductors
- 4-2002B Before Work Begins
- 4-2002C During the Course of Work
- 4-2002A Components of Irrigation Systems
- 4-2003 Planting
- 4-2003A Materials
- 4-2003A (1) Soil Amendment
- 4-2003A (2) Iron Sulfate
- 4-2003A (3) Lumber
- 4-2003A (4) Plants
- 4-2003A (5) Foliage Protectors
- 4-2003A (6) Root Protectors
- 4-2003A (7) Fertilizer
- 4-2003A (8) Wood Mulch
- 4-2003A (9) Rock Blanket
- 4-2003A (10) Gravel Mulch
- 4-2003A (11) Rock Mulch
- 4-2003A (12) Decomposed Granite
- 4-2003B Before Work Begins
- 4-2003C During the Course of Work
- 4-2003A Materials
- 4-2004 Level of Inspection
- 4-2005 Quality Control
- 4-2006 Payment
Section 20 Landscape
4-2001 General
Landscaping is covered under Section 20, “Landscape,” of the Standard Specifications. Landscaping includes highway planting and installing irrigation systems. It involves preparing areas for planting, furnishing and planting plants, and performing plant establishment work. Planting work may also include furnishing and installing landscape elements, such as inert materials. Landscaping is sometimes combined with erosion control. Erosion control is covered under Section 21, “Erosion Control,” of the Standard Specifications. For guidelines refer to Section 4-21, “Erosion Control,” of this manual.
For questions about the acceptability of materials and work for landscaping, consult the district landscape architect and landscape specialist from the Division of Maintenance.
4-2002 Irrigation
Irrigation systems may be manual or automatic, as specified in Section 20-2, “Irrigation,” of the Standard Specifications. The special provisions may require the installation of equipment that can communicate with a centrally located computer or smart controller.
4-2002A Components of Irrigation Systems
The following are the major components of an irrigation system.
4-2002A (1) Water Meter
The water meter measures the quantity of water delivered to the project. The water may be from a local water district providing domestic potable water, non-potable, recycled, or reuse water from a water treatment facility.
4-2002A (2) Backflow Preventer
The backflow preventer protects the domestic water system from contamination by preventing water within the irrigation system from siphoning back into the domestic water supply. All domestic water irrigation systems are required to have backflow prevention. The backflow preventer is installed downstream from the water meter in a domestic potable water system. Some purveyors may require backflow preventers on recycled non-potable water sources.
4-2002A (3) Wye Strainers
Wye strainers filter solid particles from irrigation water. They are installed as part of backflow preventer assemblies and at other locations in the supply lines.
4-2002A (4) Main Supply Line
The main supply line is installed downstream from the water meter and backflow preventer. The supply line carries water under pressure to the remote control valves and sprinkler heads.
4-2002A (5) Master Remote Control Valve
The master remote control valve is located downstream from the backflow preventer. Its purpose is to control the flow of water to supply lines so that they are not under constant pressure when irrigation is not taking place. The master remote control valve is opened when any remote control valve is activated.
4-2002A (6) Remote Control Valves
Remote control valves control the flow of water to lateral supply lines for the sprinklers. When not operating, they are closed. Remote control valves are usually grouped for ease of maintenance.
4-2002A (7) Quick Coupling Valve
A quick coupling valve is used to attach a hose to the irrigation system.
4-2002A (8) Gate Valve
Gate valves are manually operated to shut off water to allow repairs or modifications to the irrigation system.
4-2002A (9) Lateral Supply Line
Lateral supply lines are pipes that carry water between the remote control valves and the sprinklers. Lateral supply lines are only under pressure when the remote control valve is open.
4-2002A (10) Emitters and Sprinklers
Emitters are watering devices used for drip irrigation. They require additional filtration of the water being used in the system, because they are easily clogged. Because they apply water at a slow rate, potential erosion of the plant basins is almost nonexistent. Requirements for emitters will be included in the special provisions and on the plans. The plans will specify flow rates and operating pressures for emitters.
Sprinklers apply water in a spray pattern or by flooding the soil around plants. The special provisions and the plans specify the sprinklers by type, pattern, material, and operating characteristics. Emitters and sprinklers are installed on the lateral supply line.
4-2002A (11) Drip Valve Assembly
Drip valve assemblies prevent small particles from clogging sprinklers or emitters.
4-2002A (12) Irrigation Conduit
Irrigation conduit consists of furnishing and installing conduit and pipe used to carry irrigation water or electrical wire under roadways. They are often installed as part of a highway construction project before the highway landscaping project begins.
4-2002A (13) Irrigation Controllers
Electrically operated irrigation controllers supply low voltage to activate the remote control valves. The controllers may operate on 110-volt electrical circuits, batteries, or solar power. Irrigation controllers are placed inside heavy-duty metal enclosures bolted to concrete pads. When remote irrigation control systems are used, verify that "smart" irrigational control features are functioning before planting begins.
4-2002A (14) Electrical Pull Boxes and Conductors
These electrical components of the irrigation system supply electrical power to operate irrigation controllers and valves. Power to the irrigation controllers is 110-volt and is work performed by electricians from the electrical plans. Power to the remote control valves is low voltage and work is performed by the contractor.
4-2002B Before Work Begins
Before the irrigation system is installed, do the following:
- Verify that Form DOT CEM-3101, “Notice of Materials to Be Used,” includes all irrigation system materials. Refer to Section 6-202, “Responsibilities for Acceptance of Manufactured or Fabricated Materials and Products,” of this manual for additional information.
- When existing irrigation systems are to be maintained, review the systems with the appropriate landscape maintenance personnel. Check existing systems for proper operation and state of repair.
- Before doing any other irrigation work, locate existing irrigation conduit to be used as part of a new irrigation system. Determine the locations using as-built plan information, physical evidence such as Type A, an older style, or Type G pavement markers, pull boxes, and metal detectors. Before removing or disturbing existing pavement markers showing the location of existing conduits, mark the location on the pavement. After you have determined the locations as closely as possible, require the contractor to excavate and backfill exploratory holes. Process a change order, if necessary, to pay for additional exploration in accordance with Section 20-2.07, “Irrigation Conduit,” of the Standard Specifications. After the ends of existing conduits are exposed, examine them for damage. Check that the conduits are free of obstructions. Process a change order to pay for any necessary repair or replacement.
- When there is a bid item for check and test existing irrigation facilities, verify that the work is completed before any other work that could affect the irrigation system begins. After the contractor performs the Check and Test, review the operation of the existing irrigation systems with the contractor.
- Review with the contractor the requirements for operating existing irrigation systems. When Caltrans Maintenance forces are involved, make sure the contractor and Caltrans Maintenance personnel are aware of each party’s responsibilities. Document the responsibilities and give a copy to each party.
- For correspondence with the serving utility companies, contact the project landscape architect. Verify that, when Caltrans must do so, all orders for water and electrical service have been placed with the serving utility. If services have not been completed, check service points and meter locations with the field representative of the serving utility. Verify the availability of water in the quantities and the pressure required for the irrigation system.
- If Bid Item 995200, “ Water Meter Charges,” and Section 5-1.02F, of the special provisions, is in the contract, the contractor is responsible for paying the water bill.
- If Caltrans-furnished water expenses are included, the engineer is responsible for paying the water bill. A Form FA-2134, “Utility Account Action Request,” must be completed to transfer the charging information from the Division of Maintenance to the contract.
- For existing meters that will not be paid for under the contract, Maintenance will be responsible for paying the water bill.
- Confirm that there is a transfer of water meter charges at the end of the contract to Maintenance.
- Verify Form FA-2134 is required for new or existing water meters in the project.
- For existing water meters, when charges are moved from Maintenance to the construction contract, the engineer will complete Section 17 of Form FA-2134 to transfer the water charges. The form documents a change to the charging information but not the utility account information.
- For new water meters, the engineer will confirm the location with the supplier of the meter that is shown on the plans.
- Form FA-2134 will be completed and updated for each change in service and when granting relief from Maintenance to the contractor and at contract acceptance.
- Use Form FA-2134 to turn off or transfer water service to local agencies.
- Verify with the appropriate district unit the availability of any specified Caltrans-furnished material.
- As required by Section 20-2.01A(3), “Submittals,” of the Standard Specifications, obtain from the contractor shop drawings for the electrical components of the irrigation systems. Check that the manufacturer of the controller has approved the wiring plans. Also send the shop drawings to the district landscape architect for review. After review and authorization, forward a copy of the shop drawings to the contractor with the following written statement:
"The shop drawings are authorized pursuant to Section 5-1.23, 'Submittals,' of the Standard Specifications."
- The Division of Engineering Services Office of Electrical, Mechanical, Water and Wastewater Engineering usually designs the more complex electrical and mechanical work, such as booster pump installations. Contact that office to arrange for periodic inspections of the work as it progresses.
- Inspect irrigation system materials as they are delivered to the project site. For most irrigation system materials, Materials Engineering and Testing Services (METS) will assign responsibility for inspection to the resident engineer. Verify that the contractor furnishes certificates of compliance, when required. For all material not inspected and released by METS, inspect the material for contract compliance and complete Form DOT CEM-4102, “Material Inspected and Released on Job.” File the form with the project records.
- If existing irrigation conduits will be used in the new work, isolate the plastic pipe supply line and pressure test it under Section 20-2.07A(4), “Quality Assurance,” of the Standard Specifications.
- Check the project plans and specifications for the planned location of valves, sprinklers, and automatic controllers and, if necessary, make the following revisions:
- Move sprinklers and valves away from areas adjacent to shoulders where traffic could damage them.
- Locate irrigation controllers behind guardrail or at other locations where they will be protected from public traffic.
- Locate sprinklers away from signposts, existing trees, or other obstructions affecting coverage.
- Locate sprinklers to obtain full coverage without overspray.
- Locate sprinklers so that irrigation controllers and pump housings are not soaked.
- Locate irrigation controllers and backflow preventers within a reasonable distance from safe and legal parking. Also locate them in high visibility areas to deter vandalism.
- When the irrigation supply lines are laid out and before trenches are backfilled, schedule a meeting on the project site with the project landscape architect. This meeting provides an opportunity to look at the overall layout of the landscape system and make any desired changes.
4-2002C During the Course of Work
Use the following guidelines to make sure the various components of irrigation systems are installed and constructed as required.
4-2002C (1) Water Supply Lines and Conduit
During the course of installing water supply lines and conduit, the resident engineer must do the following:
- Inspect the installation and location of backflow preventers to check that they conform to the requirements of local codes and to the plans and specifications. Pay particular attention to the installation of gate valves and unions on each side of the backflow preventer, irrigation conduit under pavement, and valve manifolds.
- To protect soil from eroding, make sure the contractor has directed the outlets of the wye strainer or pressure relief valve toward the concrete pad.
- Observe trenching and the placement of conduit and pipe. Take measurements to verify that pipe and conduit are installed at the specified depths and setbacks.
- Make sure the contractor does not use excessive water when jacking or drilling conduit. Excessive water is any amount that would damage the roadway or create maintenance problems.
- When rocks or other debris are brought to the surface during trenching operations, decide whether such material should be removed. Base the decision on the same factors considered when preparing planting areas, in Section 4-2003C (3), “Preparing Planting Areas,” of this manual. However, whether or not you request rock removal, the contractor must protect the pipe from sharp objects and must not place rocks directly on, under, or around the pipe. Verify that the contractor backfills in the specified manner, and make notes in the daily report of all inspections.
- When rocks must be removed, prepare a change order to cover payment, and keep the required extra work records.
- If excavated material is not suitable for placing around the pipe, prepare a change order to pay for supplying and placing a clean bedding material.
- Trench widths must be such that plastic pipe that is not connected by rubber type fittings can be snaked. Snaking means placing the pipe in an undulating line to provide for expansion and contraction.
- For installing plastic pipe supply lines, thrust blocks, plastic pipe irrigation lines, and fittings, obtain a copy of the manufacturer’s instructions from the contractor. Observe the installation to verify that the contractor completes it in accordance with those instructions and the standard and project details.
- Where supply lines or conduits are installed through existing paved areas, advise the contractor of acceptable replacement material. Make sure the contractor performs such replacement.
- Check that the contractor installs dielectric couplings or bushings as specified where two dissimilar metals, such as galvanized steel and brass, are joined.
- For solvent cement welding of plastic pipe, obtain the manufacturer’s printed instructions from the contractor. Check that the contractor completes solvent cement welding in accordance with those instructions. For plastic pipe joined with solvent or glue, good practice includes immediately wiping off excess solvent or glue from the pipe. When left exposed on the surface, such material will cause rapid deterioration of the pipe.
- Check that the contractor places the specified pavement markers to show the location of irrigation conduits.
- Observe whether unattached ends of pipes, fittings, and valves are plugged or capped pending attachment of additional pipes or fittings. Use judgment in ordering compliance, but as a minimum, expect all such plugs or caps to be in place at the end of each workday to protect the inside of the pipe from debris, dirt, and animals.
- Verify that the contractor tests all pipe supply lines for leakage as specified. To hold water lines in place, partial backfill is usually allowed during testing as long as all fittings are left uncovered. Observe the testing, and note in the daily report the time when the pressure test on any segment of the irrigation system began and the results of this test. The contractor must locate and repair any leaks and repeat the test as many times as necessary.
- After backfilling and ponding or jetting, examine trenches. Require the contractor to refill trenches that have settled below the level of the surrounding area.
- Verify that the contractor has the backflow preventers tested as specified. File the test results in the project records.
- Following the specifications for functional testing, observe the operation of the entire irrigation system with the contractor. Before planting work begins, check for adequate irrigation coverage of the planting areas, and request corrections. Be aware that the valves and pipes are designed to accommodate a certain flow at a certain pressure. If the contractor adds sprinklers or increases the sprinkler nozzle size, coverage of each sprinkler will be reduced. If necessary, prepare and consult the district landscape architect for change orders for revisions to the planned irrigation system.
- Make sure the contractor replaces any existing plants that are removed or damaged during installation of the irrigation system.
4-2002C (2) Electrical Installations
During the course of installing water lines and conduit, the resident engineer must do the following:
- Observe the installation of electrical conduit for control and neutral conductors to make sure they comply with the size and type specified. When specified, verify that the pull wire or pull rope is installed.
- Check that electric service installations conform to the plans and specifications. Consult with district electrical specialists.
- Make sure that controllers are installed as specified. For each type of controller, obtain the maintenance and operations manual. Give the manual to the Maintenance landscape supervisor responsible for the irrigation system after contract acceptance.
- Verify that the contractor places a schematic wiring diagram and irrigation as-built plan in the controller enclosure as specified. The inspection date and expiration date for the guarantee must be marked on the inside face of the controllers. If required, provide a digital file to the district landscape architect and district water manager.
- Observe the installation of conduit, conductors, and pull boxes to verify compliance with the specifications.
- After trench backfilling to the required depth, observe the specified testing of conductors. Record the results of tests in the daily report.
- Before the beginning of plant establishment, witness a satisfactorily completed functional test of the irrigation system. Advise the contractor of the lengths and frequencies of the cycles to be used during the functional test. When remote irrigation control systems are used, verify that "smart" irrigational control features are functioning before planting begins. Record the test results in the daily report.
4-2003 Planting
Planting consists of preparing areas for planting, applying pesticides, furnishing and planting plants, controlling weeds, and maintaining plants until the start of the plant establishment period.
4-2003A Materials
The following provides general information on materials used for planting.
4-2003A (1) Soil Amendment
For the requirements for soil amendment, refer to the Standard Specifications. The special provisions may specify the type of material to be used.
4-2003A (2) Iron Sulfate
Iron sulfate consists of iron and sulfur. Some soils lack iron, one of the micronutrients needed for the proper formation of chlorophyll. Iron sulfate is used to correct soils deficient in iron and to lower the pH of the soil. It makes the existing iron more readily available for plants.
4-2003A (3) Lumber
Lumber, as described in the specifications, is used for header boards to define landscaped areas. Metal and composite materials are preferred for their longevity over lumber header boards.
4-2003A (4) Plants
The contract plans will specify the types and sizes of the plants to be used on a given project. If a particular plant type is unavailable from any of the contractor’s nursery sources and a change is proposed, request a recommendation of approval from the project landscape architect, who will need to review the proposal.
4-2003A (5) Foliage Protectors
Foliage protectors protect newly installed plants from animals foraging the above-ground parts of the plants. Eventually, as the plants grow larger, the need for foliage protectors decreases. On projects with lengthy plant establishment periods, the specifications may require the protectors be removed before contract acceptance.
4-2003A (6) Root Protectors
Wire mesh root protectors serve a similar purpose as the foliage protectors, providing below-ground protection from burrowing rodents.
4-2003A (7) Fertilizer
Fertilizer provides nutrients to plants that might otherwise be missing or not abundantly available from the soil. All fertilizers are labeled with the amount of nitrogen, phosphorus, and potassium (N,P,K) they are providing to the plant. The plans and specifications will indicate the type of fertilizer and applied amounts for each plant or area on the project.
4-2003A (8) Wood Mulch
Wood mulch may vary from simple installations within plant basins to larger areas as a ground cover within mass planting areas until the plants fill in and cover the ground. Wood mulch has the following benefits:
- Retains soil moisture to assist in healthy plant development
- Acts as a weed barrier
- Reduces surface erosion
Use the type of mulch shown on the plans or in the specifications. If a type is not specified, the contractor may choose one. The plans will indicate the applied amount for each plant or area on the project. Verify that the wood mulch sample complies with the size and type specified. Verify receipt of a certificate of compliance for the wood mulch. At time of delivery, verify that the wood mulch delivered matches the sample provided. Bring the sample to the field to compare. Measure each delivery in the vehicle before unloading.
4-2003A (9) Rock Blanket
Rock blanket is cobble rock that is placed in a concrete base on the ground. It provides an attractive alternative to bare ground and keeps soil from eroding. The specifications will state what the size of the rock should be and the detail will show the depth of excavation and thickness of the mortar and concrete.
4-2003A (10) Gravel Mulch
Gravel mulch is used to provide pathways or cover the ground plane to minimize erosion. The rock is crushed and compacted to provide a more solid surface. The rock size gradations are shown in the specifications.
4-2003A (11) Rock Mulch
Rock mulch may vary from simple installations around plant basins to larger areas as a ground cover within mass planting areas. Verify that the rock mulch sample complies with the size and type specified. Verify receipt of a certificate of compliance for the rock mulch. At time of delivery, verify that the rock mulch delivered matches the sample provided. Measure each delivery in the vehicle before unloading.
4-2003A (12) Decomposed Granite
Decomposed granite is used similarly to gravel mulch. The material is more complex to construct because it requires solidifying emulsions and layered construction to achieve a solid surface. The rock size gradations are shown in the specifications. Because decomposed granite erodes easily, it should not placed where there are concentrated flows of water.
Section 20-5.03, “Inert Ground Covers,” of the Standard Specifications provides material and size requirements for rock blanket, gravel mulch, and decomposed granite. Verify receipt of a certificate of compliance for these materials.
4-2003B Before Work Begins
Before work begins, do the following:
- Review the plans and specifications to determine the requirements for highway planting.
- Verify that Form DOT CEM-3101, “Notice of Materials to Be Used,” includes highway planting materials. Refer to Section 6-202, “Responsibilities for Acceptance of Manufactured or Fabricated Materials and Products,” of this manual for additional information.
- Take photos of existing site conditions.
- Invite the district landscape architect or project landscape architect and the Maintenance landscape specialist to visit the site. Review the areas to be planted and verify the limits and work involved in roadside clearing. Discuss any unusual features or potential problem areas.
- Make sure the contractor is aware of any special requirements, particularly any facilities or plants that must be preserved and protected.
4-2003B (1) Pesticides
Before any work using pesticides begins, do the following:
- Review the specifications covering pesticide use.
- Review the guidelines for pesticide use contained in Chapter C2, “Vegetation Control,” of the Caltrans Maintenance Manual.
- Obtain and review a copy of the contractor’s recommendations for pesticide use, as submitted to the contractor by a licensed pest control adviser. For assistance, you may call the Maintenance landscape specialist, who is an expert in this area. Verify that the recommended pesticides are limited to those specified in the special provisions. Any change in the specified pesticides must be made by a change order.
- Some jurisdictions have environmentally sensitive areas where special requirements or prohibitions may apply. Consider any restrictions imposed by county agricultural commissioners, federal or tribal landowners and written on permits.
- Check that the proposed application rates or other features will not cause damage to abutting properties or to existing plants that must remain. Do not approve application of granular pesticides unless they are covered by mulch. Without mulch, these pesticides can be carried to other locations by runoff.
- Upon completion of the necessary reviews, advise the contractor in writing that the pest control adviser’s recommendations have been authorized in accordance with the provisions of Sections 5-1.23, “Submittals,” and 20-1.01C, “Submittals,” of the Standard Specifications.
4-2003B (2) Plants
Before any work with plants begins, do the following:
- Discuss the requirements for plants with the contractor and ask if the contractor wants the inspection of plants to occur before shipping. Make sure the contractor understands that the plants will still be subject to inspection at the job site.
- The inspection should be done after the contractor submits the required 10-day notice of the plant shipping date. Before the plants are delivered to the job site, agree with the contractor on a safe and secure place where the delivery and inspection can take place. The plant inspector must document the results of the inspection, including rejection of any plants and the reasons for rejection. The inspector must send the report to the resident engineer. However, plants that have been examined at the nursery are still subject to inspection at the job site. Inspect plants for compliance with Section 20-3, “Planting,” of the Standard Specifications, and with any special provisions. The following are guidelines for plant inspection.
- Examine the plants and their name tags to confirm the plants are of the variety and size specified.
- Verify that the variety and quantity of plants delivered is consistent with the delivery invoice on picking ticket.
- Reject plants that are wilted, broken, out of the container, or otherwise unsuitable when delivered to the planting area. Note such rejection in the daily report.
- Check to see if plants are obviously deformed, diseased, or insect-infested. Obtain inspection certificates that indicate all plants comply with federal and state laws requiring inspection for diseases and infestations. Before accepting plants from another county, require the contractor to produce evidence of clearance from the county agricultural commissioner
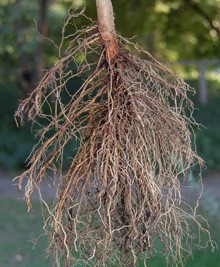
- For the specified number of plants, remove soil from the roots of container-grown plants to determine the condition of the roots. Check that enough roots have grown so that the soil and root ball will hold together when planting. Refer to Section 20-3.01A(4), “Quality Assurance” of the Standard Specifications.
- Do not accept root-bound plants. Refer to Figure 4-20.1., "Roots," for an example of acceptable and unacceptable roots. After a root-bound plant is planted, water cannot penetrate the tight mass of roots; or at maturity, the plant may strangle itself. Root-bound plants occur when seedlings are grown too long in small containers. The roots grow to the bottom of the container and then turn and grow around the ball of the plant. It is difficult to overcome a root-bound condition merely by planting in the ground.
- Check for root girdling in plants that have a main taproot. Girdling occurs when a plant has been left in a container for too long. The taproot circles and chokes the root system until the plant eventually dies.
- Check that plants in large containers have not recently been transplanted from a smaller container. Roots should be in proportion to the container from which they are taken.
- Make random measurements of Carpobrotus cuttings to verify that the cuttings equal the specified length.
|
Good Roots Acceptable |
|
|
Girdled-Root Plant Unacceptable |
|
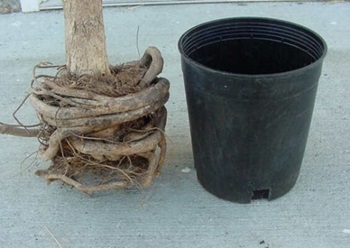
Figure 4-20.1. Roots
4-2003C During the Course of Work
Use the following guidelines to assure planting complies with the plans and specifications.
4-2003C (1) Roadside Clearing
Roadside clearing includes killing, removing, or mowing weeds and other vegetation, and controlling rodents. Do not confuse roadside clearing with clearing and grubbing work, which is more closely associated with excavation activity. Sometimes tree removal work is paid separately from roadside clearing and will be called out separately on the project plans. During roadside clearing, do the following:
- Review the requirements for water pollution control. It may be desirable to leave some vegetation on the slopes to reduce the potential for stormwater pollution during the rainy season.
- Make sure the contractor removes stumps and large roots to the depth specified. Check areas to be planted to verify that they are free of living weeds at the time of planting.
- Gophers are among the rodents requiring control. Evidence of gophers includes surface mounds left from nighttime tunneling when the gophers eat plant roots and chew on irrigation wires. Their burrows can damage plant basins. Baiting, carbon dioxide, and trapping are the methods used to control gophers. Some counties have rodent abatement programs and will give expert advice upon request. Check for project permit restrictions. For information, contact the Maintenance landscape specialist.
4-2003C (2) Pesticides
During pesticide use, do the following:
- Observe the mixing and applying of pesticides to make sure these processes comply with the approved recommendations and specifications. Check that workers applying pesticides wear protective clothing, including eye protection. A person with a pesticide applicator’s license must be at the site. However, the person spraying the chemicals does not need a license, but must have a pesticide applicator's certificate. Include notes about the pesticide application in the daily report.
- Provide the contractor with Form DOT CEM-1220, “Report of Chemical Spray Operations.”
- Obtain a completed chemical spray report from the contractor each week. Retain one copy in the project files, and forward other copies in accordance with district procedures.
- Early enough in the contract so a good weed kill can be obtained, verify that the contractor has applied the specified pesticide to problem weeds, such as Bermuda grass. Watering and repeating the application multiple times is sometimes necessary for a complete weed kill. Consult with the Maintenance landscape specialist for a recommendation for the particular type of weed that requires controlling.
4-2003C (3) Preparing Planting Areas
After roadside clearance, irrigation system installation, and pressure testing and backfilling, the preparation of planting areas begins. During this preparation, do the following:
- Using the plan sheets for plant layout, check that the location for plants and the perimeter of ground cover areas are designated with gypsum, small wire-mounted flags, or other suitable markers. The contractor must furnish the labor, materials, and transportation for placing stakes or other suitable markers to indicate the designated locations. Verify that the irrigations plans serve the same areas identified in the planting plans. Contract the district landscape architect immediately for inconsistences between these sets of plans. This phase of designating locations is when necessary changes can be made with the least inconvenience and cost to the contractor or to Caltrans.
- When establishing plant locations, assure compliance with the guidelines in Chapter 900, “Landscape Architecture,” of the Highway Design Manual, which contains planting design standards.
- Check that plant locations meet the minimum setbacks from the traveled way, pavements, fences, walls, and ditches, as shown on the plant list or in a detail in the contract plans. However, plant locations on the ground do not need to match the plans exactly. The contractor may need to adjust the locations of shrubs and trees for proper setback from the traveled way. Whenever possible, also avoid extremely rocky or poorly drained areas, old roadbeds, sign locations, and utility lines. Keep in mind the intended purpose of the planting, and visualize the size, shape, and characteristics of the mature plants. Select locations so branches of mature plants will not extend into the roadway or over a right-of-way fence.
- If cultivation will be required, the plans or special provisions will say so.
- Before planting, irrigate and kill weeds for the length of time specified.
- Check that the soil is loosened to the specified depth.
- When rocks are encountered in an area of predominantly fine native materials, most rocks larger than 2.5 inches should be removed. In predominantly rocky areas, consult with the project landscape architect for alternatives to removing rocks.
- If rocks need to be removed, prepare a change order to pay for disposal. Consider using the rocks at drainage outlets or other areas to prevent erosion.
- To support payment, maintain adequate records of cultivation. When the contract item for cultivation includes payment for soil amendments and fertilizer, make sure these materials are incorporated at the specified rates. Note your observations in the daily report.
4-2003C (4) Header Boards
Measure header boards, and verify that they are installed as the contract requires. Check that nails, lag screws, and hardware are galvanized and that lumber is of the specified quality.
4-2003C (5) Planting
Inspect the planting operation and check that the requirements specified in the plant list are met for the following:
- Hole size
- Basin type
- Iron sulfate
- Soil amendment or fertilizer
- Basin mulch
- Foliage and root protectors
- Plant stakes, if required
Irrigation functional test is approved before planting work to assure irrigation water availability. Observe planting activities to make sure of the following:
- Only plants that can be planted and watered on the same work shift should be distributed along the roadside.
- Containers are not cut until delivered to the planting area.
- Roots of plants not in containers remain covered and moist.
- Before transporting the plants to the planting area, nursery stakes are removed from the plants at the project site.
- Before ground cover is planted, trees and shrubs for such areas are planted, watered, mulched, and staked if required.
For ground cover, make sufficient observations to verify the following:
- Cuttings are placed to the required depth.
- The soil is moist at the time of planting.
- Plants are watered as specified.
- The specified spacing is provided.
Do the following during the course of planting:
- Note all observations in the daily report, including any pertinent instructions given to the contractor.
- Before planting in holes or trenches, verify that the contractor has prepared backfill and has applied water as specified. Before backfill is tamped down, check that the plants are straight in their holes.
- Review planted areas to make sure plants have been staked and tied in the specified manner.
- Mulch, if required, must be placed as soon as possible after planting. It will help to retain moisture and discourage weeds. Verify the removal of wood chips that are longer than the specifications allow. Keep mulch away from drainage channels and away from plant trunks. Postpone planting and mulch work in extremely wet weather when trampling the areas would compact the soil and hold excessive moisture around the plant.
- Prepare adequate records for planting work completed to process monthly progress payments.
- When it is obvious that plants will not survive or will be damaged severely because of weather, consider allowing a delay of planting until a more favorable period. If planting, delayed because of unfavorable weather conditions, is the controlling operation, you may grant nonworking days in accordance with Section 8, “Prosecution and Progress,” of the Standard Specifications. This also applies to replacement plants during the plant establishment period.
4-2003C (6) Watering
For watering, do the following:
- Make sure the contractor applies sufficient water so the plants will develop properly. Too much water, improperly applied, can cause damage. Factors such as weather, soil, and plant type determine the amount of water and frequency of application.
- Beginning with the initial watering, closely check the amount of water applied and the manner in which it is applied. Most plants should be watered immediately after they are planted. Do not allow initial watering to be delayed until the following day.
- To assure that watering requirements are met, periodically observe planted areas after initial watering. If your district has a “water manager,” obtain guidance regarding when the irrigation controller is ready to be programmed.
- Verify that the irrigation system distributes water evenly. Routinely check the sprinklers' water distribution pattern to assure proper coverage of plants and that water does not reach the traveled way.
- If water use calculations as part of the Model Water Efficient Landscape Ordinance are provided as supplemental project information, verify that the plants are being watered in accordance with the calculations in Section 20-1.03A, "General," of the Standard Specifications.
- Plants should be sufficiently watered without causing excess water use penalties from the supplier. Check with the district water manager for restrictions for the project location.
4-2003C (7) Replacement
A plant need not die before the contractor replaces it. Make sure the contractor replaces any plants that have been injured or damaged sufficiently to render them unsuitable.
When a replacement plant would not survive because of forecast weather or other predictable causes, consider delaying replacement until a more favorable time.
To substitute an alternative species, seek authorization through a change order and obtain concurrence from the project landscape architect.
4-2003C (8) Plant Establishment Work
The objective of plant establishment is to assure that, before contract acceptance, plants are healthy and established and the irrigation system works as planned.
Caltrans has two categories of plant establishment, described as follows:
- Type 1, which is typically used on projects in which highway planting is a major portion of the work.
- Type 2, which is used on projects if highway planting is incidental to other work.
Plant establishment consists of caring for the planting as specified. The plant establishment period begins on the date stated in your written notification to the contractor. However, each plant must still be maintained after it is planted and watered for the first time. Planting must be properly maintained both before and during plant establishment. During the course of plant establishment, do the following:
- Check regularly to make sure the contractor replaces plants that are severely weakened, have died, or have not been properly maintained. Replacement of plants because of improper maintenance or failure to address problems will be at the expense of the contractor. Replacement plants must be planted at the earliest opportunity. A plant that was planted earlier and maintained longer should be more developed and should require less maintenance upon completion of the contract than one planted late in the plant establishment period.
- Check that the contractor follows specifications requiring plants and planted areas to be well watered. The words “well watered” mean more than just enough water to keep a plant alive. It is intended that the plant will flourish during plant establishment. Once the root systems become established, watering can be reduced.
- Review the contractors' seasonal watering schedule submittals to verify that seasonal adjustments have been made from the previously submitted schedules.
- Verify that the contractor maintains sufficiently formed basins as shown in the project details around each plant to keep irrigation water over the root ball and to provide ample room for the required mulch.
- Make sure the contractor controls weeds as specified. Without weed control, the weeds’ rapid growth, especially in plant basins, will reduce the availability of moisture and nutrients to the plant. If plants compete with weeds for moisture, nutrients, and sunlight, they will not develop properly.
- Within basins or header boards and adjacent to fences, make sure ground cover is removed from paved areas, as specified.
- From roadside clearing and planting areas, make sure the contractor removes surplus earth that has accumulated.
- Verify that fertilizer is applied at the specified time, in the required amounts, and distributed evenly. Prohibit the concentration of commercial fertilizer at the base or stem of the plant; otherwise, injury to the plant will result.
- Require the contractor to give instructions on the use and adjustment of the irrigation controllers as required in the specifications. Invite the appropriate landscape maintenance personnel to the instructional session.
- Keep construction area signs in place until all work is complete, including plant establishment. If appropriate, use temporary traffic control signs during plant establishment work.
- Conduct one or two walk-throughs with Design and Maintenance Division staff to assist with developing punch list items for the contractor to do during the plant establishment.
4-2003C (8a) Administering Plant Establishment Time Requirements
In administering the time requirements for plant establishment, do the following:
- Notify the contractor of the beginning of the plant establishment period. On Form DOT CEM-2701, “Weekly Statement of Working Days,” under “Remarks,” note the date of the first day of the plant establishment period.
- During the plant establishment period, credit the contractor with one plant establishment working day for each day, except Saturdays and holidays, that plant establishment work is satisfactory. Note that holidays include Sundays under state statute.
- Verify that all required establishment work is complete before crediting the contractor for plant establishment working days.
- Request corrective work in writing. If the contractor does not correct deficiencies within a reasonable period, do not give credit for plant establishment days. In most cases, a response time within 2 weeks is reasonable to expect. It is generally best to request corrections no more often than once each week. Whenever progress is made on correcting deficiencies, provide credit for plant-establishment working days when there are not new deficiencies during the correction work.
4-2003C (8b) Tracking Time for Type 1 Plant Establishment
For Type 1 plant establishment, the contractor must complete all work except plant establishment before the plant establishment period begins. Only plant establishment may be in progress during the plant establishment period. The special provisions require plant establishment to be performed satisfactorily for a specified number of working days.
Until plant establishment begins, track contract time on Form DOT CEM-2701, “Weekly Statement of Working Days.” After plant establishment begins, continue filling out the upper part of the form as before. Show all days except Saturdays and holidays, which include Sundays as holidays, as working days, regardless of weather or other conditions. Track the progress of plant establishment under “Remarks” in a manner similar to that shown in the sample weekly statement of working days at:
https://dot.ca.gov/programs/construction/contract-time
Credit all working days as plant establishment days except for days on which the contractor fails to satisfactorily perform plant establishment work.
4-2003C (8c) Tracking Time for Type 2 Plant Establishment
Two time limits are specified for projects with Type 2 plant establishment. An amount for liquidated damages is also specified for each time period. The following are the two time periods:
- The number of working days for all work except plant establishment.
- The total number of working days for all contract work, including the plant establishment period.
For Type 2 plant establishment, the contractor must complete all highway planting before plant establishment begins. In addition to plant establishment, other contract work may be in progress during the Type 2 plant establishment period.
Show the “Revised working days for contract” as the number of days specified plus approved change order days for all work except plant establishment. Fill in Form DOT CEM-2701, and track the progress of plant establishment as shown under “Remarks.”
For an example of how to track time and the final weekly statement of working days, refer to:
https://dot.ca.gov/programs/construction/contract-time
4-2004 Level of Inspection
Levels of inspection for landscape work activities are generally driven by progress inspections in the Standard Specifications. Those activities are:
- Benchmark inspection for typical landscape work such as irrigation system installation, planting, and plant establishment.
- Intermittent inspection for work such as pressure testing of water supply lines and irrigation system functional tests.
4-2005 Quality Control
Pressure testing of irrigation system water lines is covered under Section 20-2.01A(4)(b), “Pressure Testing,” of the Standard Specifications.
For water supply lines on structures, verify that the contractor tests the lines before:
- Backfilling at locations that would cover lines.
- Starting work on box girder cell decks.
- Doing any other work that would cover lines.
The contractor must repair any water lines that fail required tests. The lines must be retested after the repairs are completed.
Record the results of tests in the daily report.
4-2006 Payment
The specifications typically require that irrigation system work is paid for by measurable individual contract items rather than lump sum. Use the methods of measurement specified for each contract item. Final pay items such as pipe do not require measurements.
Construction Manual Chapters
Chapter 1 - Caltrans Construction Organization
Chapter 2 - Safety and Traffic
Chapter 3 - General Provisions
Chapter 4 - Construction Details
Chapter 5 - Contract Administration
Chapter 6 - Sampling and Testing
Chapter 7 - Environmental Stewardship
Chapter 8 - Employment Practices
Chapter 9 - Projects Sponsored by Others